I have a particular question wich deals with BMW I3 drivetrain. I think it is 2016...
My friend says it started to get loud suddenly. He recoreded the sound of the motor accelerating.
I changed the file ending to txt so i could upload it. If you want to hear it replace TXT ending with WMA.
I remember our case with Opel Ampera drivetrain exit bearing but there was much more pronounced saw blade sound because of the broken bearing cage.
Does anyone know what would be the cause of the loud motor? Any particular experiences?
thank you
BMW I3 motor noise
Re: BMW I3 motor noise
Its not very common but the bearings have failed on these motors before, the mounts have a habit of failing too and there was a BMW recall and uodate to replace the mounts.
-
arber333
- Posts: 3578
- Joined: Mon Dec 24, 2018 1:37 pm
- Location: Slovenia
- Has thanked: 134 times
- Been thanked: 342 times
- Contact:
Re: BMW I3 motor noise
Well we did it!
First, it was true. The larger bearing near the gearbox has almost failed. The noise was a simptom of grease not being there anymore...
When i opened the motor i saw quite some play in the front bearing. But i am getting ahead of myself...
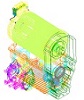
BMW I3 Motor dissassembly
1. We disabled the car HV system and removed 12V power while the car was in "neutral". This because we had to be sure the wheels wouldnt lock up automatically. HV disconnect is located under the hood as an orange connector. You unlock it and disconnect. I also fitted a screw driver as a safety just because...
2. We removed the underbody panels to access the motor mount bolts.
3. We unbolted the X panel at the back and pushed it back. It can be removed, but that would require to rem ove the rear bumper... too much work to do that.
4. We removed the AC compressor from the motor case and suspended it on the opposite side. We did not need to remove AC hoses... Mind you we had a car with AC but not heat pump system. Battery was cooled by AC and heated by HV foil heaters inside the battery case not heat pump system.
5. We had the motor in sights and we first unbolted each suspension arm to remove driveshafts on each side. To unlock the shafts from gearbox i used a flat screwdriver and steel prybar.
6. We unlocked all HV cables from inverter and prepared for motor removal. First we had to remove the charger from the back side.
7. Some photos from the back when we used a lift trable witrh some wood blocks to lower the motor. First we had to remove the large longitudinal brace as this was the mode without REX. Then we unbolted the side mounts
8. We lifted the motor to a giraffe mount so it was easier to remove its gearbox and inverter. We removed gearbox with ease. But for inverter i had to be carefull as there were a lot of signal cable connections.
First, it was true. The larger bearing near the gearbox has almost failed. The noise was a simptom of grease not being there anymore...
When i opened the motor i saw quite some play in the front bearing. But i am getting ahead of myself...
BMW I3 Motor dissassembly
1. We disabled the car HV system and removed 12V power while the car was in "neutral". This because we had to be sure the wheels wouldnt lock up automatically. HV disconnect is located under the hood as an orange connector. You unlock it and disconnect. I also fitted a screw driver as a safety just because...
-
arber333
- Posts: 3578
- Joined: Mon Dec 24, 2018 1:37 pm
- Location: Slovenia
- Has thanked: 134 times
- Been thanked: 342 times
- Contact:
Re: BMW I3 motor noise
9. We went on and removed small bolts from front alu plate to allow us to lift the front part of the motor from the rest of the casing.
To my surprise the whole cooling channel will lift together with the front plate!!!
10. Then i took the motor home to pry the bearings off. I first removed the front bearing. It had considerable play. To my surprise the front casing had a loose fit for the bearing with a spring plate to prevent bearing flutter.
Then i removed the resolver and its core to get access to press out the rear bearing. CAUTION! When you remove the resolver winding you absolutely need to mark the position of resolver core. The core is mounted on its own steel bushing that needs to be marked against the main shaft as well.
If you dont mark relative position then you may expect this result: https://evclinic.eu/2024/10/27/huston-w ... th-bmw-i3/
Then we went to the press to get the rear bearing off... carefully
Secure all hardware. When removing the rotor you need to treat it with care as it is a giant magnet and can pick up metal shavings which can cause headaches later...
Then i used press to remount new bearings in reverse order of dissassembly. I took great case to correctly fit the resolver core.
Also when reinstalling the motor to gearbox take great care when packing the grease. I put it inside the splines not on the gearbox side as i noted there is another small O-ring there which obviously prevents grease to slide past the shaft and could damage motor internals. The small packing of grease is quite enough to lubricate the motor joint.
The hardware needed to replace the bearings:
Front bearing 6306-2RZ/C3GJN 30x72x19mm SKF Deep Groove Ball Bearing
Rear bearing 6006 2RZ Deep Groove Ball Bearing SKF
2x motor O - rings 245 x 5mm NBR70
Also consumables that i consider a must:
Nicro 636 sticky grease for O-ring fitting and final assembly, it is also good to stick washers and other hardware for off hand assembly
Spline grease 5g for gearbox motor junction which is not internally lubricated: GE 83232357146
Gearbox oil 0.5L: Hypoid axle oil G3 P/N 83222413512
BMW coolant: LC87 blue P/N 8351A6CDD7
To my surprise the whole cooling channel will lift together with the front plate!!!
If you dont mark relative position then you may expect this result: https://evclinic.eu/2024/10/27/huston-w ... th-bmw-i3/
Also when reinstalling the motor to gearbox take great care when packing the grease. I put it inside the splines not on the gearbox side as i noted there is another small O-ring there which obviously prevents grease to slide past the shaft and could damage motor internals. The small packing of grease is quite enough to lubricate the motor joint.
The hardware needed to replace the bearings:
Front bearing 6306-2RZ/C3GJN 30x72x19mm SKF Deep Groove Ball Bearing
Rear bearing 6006 2RZ Deep Groove Ball Bearing SKF
2x motor O - rings 245 x 5mm NBR70
Also consumables that i consider a must:
Nicro 636 sticky grease for O-ring fitting and final assembly, it is also good to stick washers and other hardware for off hand assembly
Spline grease 5g for gearbox motor junction which is not internally lubricated: GE 83232357146
Gearbox oil 0.5L: Hypoid axle oil G3 P/N 83222413512
BMW coolant: LC87 blue P/N 8351A6CDD7
-
johu

- Site Admin
- Posts: 6769
- Joined: Thu Nov 08, 2018 10:52 pm
- Location: Kassel/Germany
- Has thanked: 383 times
- Been thanked: 1589 times
- Contact:
Re: BMW I3 motor noise
wow, that's heroic, great work!
Support R/D and forum on Patreon: https://patreon.com/openinverter - Subscribe on odysee: https://odysee.com/@openinverter:9
-
arber333
- Posts: 3578
- Joined: Mon Dec 24, 2018 1:37 pm
- Location: Slovenia
- Has thanked: 134 times
- Been thanked: 342 times
- Contact:
Re: BMW I3 motor noise
Thanks...
It was a bit touch and go i admit. After i tried to reassemble resolver core i started to doubt myself and couldnt get myself to put the core back in. What if... In the end we went on a test drive and the car was good up to 147km/h... [sigh of relief]
However i talked to another guy who was a bit apprehensive to this commercial bearing replacement. He told me to go and dissasemble the bearings to see if there should be special magnetic flux resistant bearings - black balls or special cage
Stay tuned i will get to it in a couple of days...