Mitsubishi Outlander AC Compressor: Difference between revisions
m Adding dimensions and weight, along with photos of the dimensions |
Categories |
||
| (7 intermediate revisions by 3 users not shown) | |||
| Line 1: | Line 1: | ||
The Outlander PHEV has a CAN bus controller AC compressor. '''One thing to note, your old system components will likely need flushing of the old oil as it's damaging to compressor motor wiring lacquer. It can cause shorts.''' When getting your system refilled, it needs to contain compatible lubricating oil, POE MA68EV is listed in the manual, likely the same as other hybrids/electric cars. | The Outlander PHEV has a CAN bus controller AC compressor. | ||
==General Remarks on AC Systems== | |||
[[File:Outlander AC Line Plugs.png|thumb|3D Printed Plugs<ref name=":0">3D Printable AC line plugs: https://www.printables.com/model/949837</ref>]] | |||
'''One thing to note, your old system components will likely need flushing of the old oil as it's damaging to compressor motor wiring lacquer. It can cause shorts.''' When getting your system refilled, it needs to contain compatible lubricating oil, POE MA68EV is listed in the manual, likely the same as other hybrids/electric cars. | |||
To avoid dirt, debis and moisture entering the AC compressor, you can 3D print some plugs to close off the holes of the AC lines, the files can be accessed on Printables <ref name=":0" />. | |||
==First Generation (Part Number 7813A378)== | |||
===Dimension and 3D Scan=== | |||
[[File:Outlander 7813A378 3D Scan.png|thumb|3D Scan of the Outlander 7813A378 Compressor<ref name=":1">Outlander AC Compressor 3D scan: https://grabcad.com/library/outlander-phev-ac-compressor-1</ref>]] | |||
The 3D scan of the Outlander AC compressor is provided by Tomdb on GrabCAD <ref name=":1" /> | |||
{| class="wikitable" | {| class="wikitable" | ||
|+ | |+Sizes | ||
|Weight | |||
| | |||
|- | |||
|Length | |||
|22.5cm | |||
|- | |||
|Height | |||
|24cm (including the HV cable) | |||
21.5cm (excluding the HV cable) | |||
|- | |||
|Width | |||
|12.5cm (excluding the refrigerant connections) | |||
|} | |||
[[File:Outlander AC Compressor Bolt Pattern.png|thumb|Bolt Pattern Drawing<ref name=":2">Outlander Compressor 7813A378 Bolt Pattern: https://www.printables.com/model/949824</ref>]]The bolt pattern of the AC compressor is shown in the drawing on the left. A high resolution drawing as well as some models to aid the design of a custom bracket are available on Printables<ref name=":2" />.<gallery> | |||
File:Outlander AC Compressor Length.png|Length | |||
File:Outlander AC Compressor Height.png|Height | |||
File:Outlander AC Compressor Width.png|Width | |||
</gallery> | |||
==Second Generation (Part Number 7813B097)== | |||
===Dimension and 3D Scan=== | |||
Currently no 3D scan of the newer style AC compressor is available yet. | |||
{| class="wikitable" | |||
|+Sizes | |||
|Weight | |Weight | ||
|6.2kg | |6.2kg | ||
|- | |- | ||
|Length | |Length | ||
|19cm | |19cm | ||
|- | |- | ||
| Height | |Height | ||
|20cm | |20cm | ||
|- | |- | ||
|Width | | Width | ||
| 12cm | | 12cm | ||
|} | |} | ||
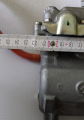
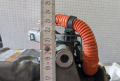
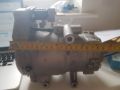
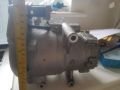
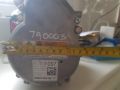
<gallery perrow="3" caption="Dimension of the Model Year 2018 Outlander AC Compressor"> | |||
File:Length.jpg|Length | |||
File:Height.jpg|Height | |||
File:Width.jpg|Width | |||
</gallery> | |||
==Connections== | |||
===Refrigerant Connections=== | |||
The part numbers for the Mitsubishi hoses are ''AMD45418'', ''AMD46168. Unconfirmed, but thought that these fit'' https://www.evcreate.nl/shop/airconditioning/adapter-set-airconditioning-compressor/ | |||
The correct fitments on Aliexpress | |||
[[File:20220818 123558.jpg|none|thumb|Outlander compressor hose connections]] | |||
https://www.aliexpress.com/item/1005001688953296.html R134 4 curved and R134 5 curved was what I ordered, so 11.5mm and 14mm. | |||
{| class="wikitable" | {| class="wikitable" | ||
|+ | |+ | ||
|[[File:AC Connection.jpg|thumb]] | |||
|[[File: | |[[File:AC Connection2.jpg|thumb]] | ||
|[[File: | |||
|} | |} | ||
| Line 26: | Line 77: | ||
[[File:Heater Connector Pins.png|none|thumb|1 - 12v, 2 - GND, 3 - CAN H, 4 - CAN L]] | [[File:Heater Connector Pins.png|none|thumb|1 - 12v, 2 - GND, 3 - CAN H, 4 - CAN L]] | ||
[[ | ===High Voltage Connection=== | ||
[[Category:Mitsubishi]] | The compressor is connected with a 40amp fuse to high voltage. | ||
[[Category: | Older models don't have the HV socket as shown above, but have the wire attached. Polarity is the same as the heater. | ||
[[File:Outlander Heater HV.jpg|none|thumb]] | |||
Newer models have a socket. [Place holder for part number] | |||
[[File:20220712 131123.jpg|none|thumb|HV connector. Left is negative, right positive.]] | |||
[[File:20220712 172319.jpg|none|thumb|AC compressor driver board.]] | |||
==Controlling the Compressor== | |||
===Control Messages=== | |||
0x185 controls the compressor and 0x285 is also required for operation, much like other outlander components. It broadcasts a few ids, 0x388 seems to be useful and contains it's status. | |||
====0x185 - Control Message==== | |||
The first byte, byte 0 controls the state of the compressor 0x08 is standby and 0x0B is start command | |||
The second byte, data[1] doesn't seem to have a function. | |||
The third byte is unknown but 0x1D works. | |||
The forth and fifth also seem to not do anything. | |||
Sixth byte is RPM control, 0x08 is inactive, 0x09 to 0x54 | |||
Seventh is also unknown, 0x00 works | |||
Eighth is also unknown either 0x00 or 0x03 work | |||
====0x388 - Status Message==== | |||
First byte, 0x01 is HV present. 0x02 is No HV present, 0x7C is startup/running. | |||
Third and Fourth bytes seem to be RPM feedback. | |||
Eighth byte status 0x00 is no CAN, 0x01 CAN error, 0x02 is 0x285 receive error and 0x03 other error | |||
====Example control code==== | |||
void sendCANframeE() { //AC compressor | |||
outframe.id = 0x185; // 0x185 0B 00 1D 00 00 08 00 03 | |||
outframe.length = 8; // Data payload 8 bytes | |||
outframe.extended = 0; // Extended addresses - 0=11-bit 1=29bit | |||
outframe.rtr=1; //No request | |||
if(digitalRead(AC_pin) == LOW) { //AC pin is active | |||
outframe.data.bytes[0]=0x0B; // status command 08 stbd, 0B start | |||
} | |||
else { | |||
outframe.data.bytes[0]=0x08; //if we sense LOW we go to standby | |||
} | |||
outframe.data.bytes[1]=0x00; // | |||
outframe.data.bytes[2]=0x1D; // 1D works | |||
outframe.data.bytes[3]=0x00; // | |||
outframe.data.bytes[4]=0x00; // | |||
if(digitalRead(AC_pin) == LOW) { // AC is active | |||
if (ACrpm <= 3800) { // Power for spinup | |||
outframe.data.bytes[5]=0x25; // RPM command 08 to 54 | |||
} | |||
else if ((ACrpm > 3500) && (ACrpm <= 4200)) { // power is reduced | |||
outframe.data.bytes[5]=0x20; // RPM command 08 to 54 | |||
} | |||
} | |||
else { | |||
outframe.data.bytes[5]=0x08; //AC pin is inactive | |||
} | |||
outframe.data.bytes[6]=0x00; | |||
outframe.data.bytes[7]=0x03; // can be 00 or 03, it does not differentiate | |||
if(debug) {printFrame(&outframe,1);} //If the debug variable is set, show our transmitted frame | |||
if(myVars.CANport==0) Can0.sendFrame(outframe); //Mail it | |||
else Can1.sendFrame(outframe); | |||
This thread contains more detail information and is recommended reading: https://openinverter.org/forum/viewtopic.php?t=1997&start=25 | |||
==References== | |||
<references /> | |||
[[Category:Mitsubishi]] | |||
[[Category:AC Compressor]] | |||
Latest revision as of 16:17, 20 December 2024
The Outlander PHEV has a CAN bus controller AC compressor.
General Remarks on AC Systems

One thing to note, your old system components will likely need flushing of the old oil as it's damaging to compressor motor wiring lacquer. It can cause shorts. When getting your system refilled, it needs to contain compatible lubricating oil, POE MA68EV is listed in the manual, likely the same as other hybrids/electric cars.
To avoid dirt, debis and moisture entering the AC compressor, you can 3D print some plugs to close off the holes of the AC lines, the files can be accessed on Printables [1].
First Generation (Part Number 7813A378)
Dimension and 3D Scan

The 3D scan of the Outlander AC compressor is provided by Tomdb on GrabCAD [2]
| Weight | |
| Length | 22.5cm |
| Height | 24cm (including the HV cable)
21.5cm (excluding the HV cable) |
| Width | 12.5cm (excluding the refrigerant connections) |

The bolt pattern of the AC compressor is shown in the drawing on the left. A high resolution drawing as well as some models to aid the design of a custom bracket are available on Printables[3].
-
 Length
 -
 Height
 -
 Width
Width


Second Generation (Part Number 7813B097)
Dimension and 3D Scan
Currently no 3D scan of the newer style AC compressor is available yet.
| Weight | 6.2kg |
| Length | 19cm |
| Height | 20cm |
| Width | 12cm |
- Dimension of the Model Year 2018 Outlander AC Compressor
-
 Length
 -
 Height
 -
 Width
Width


Connections
Refrigerant Connections
The part numbers for the Mitsubishi hoses are AMD45418, AMD46168. Unconfirmed, but thought that these fit https://www.evcreate.nl/shop/airconditioning/adapter-set-airconditioning-compressor/ The correct fitments on Aliexpress

https://www.aliexpress.com/item/1005001688953296.html R134 4 curved and R134 5 curved was what I ordered, so 11.5mm and 14mm.
 |
 |
Low Voltage Connection
The mating connector is Sumitomo 6189-0126 https://www.auto-click.co.uk/6189-0126?search=90980-10942 and the pinout is the same as the water heater. Connector also available cheap on aliexpress.

High Voltage Connection
The compressor is connected with a 40amp fuse to high voltage. Older models don't have the HV socket as shown above, but have the wire attached. Polarity is the same as the heater.

Newer models have a socket. [Place holder for part number]


Controlling the Compressor
Control Messages
0x185 controls the compressor and 0x285 is also required for operation, much like other outlander components. It broadcasts a few ids, 0x388 seems to be useful and contains it's status.
0x185 - Control Message
The first byte, byte 0 controls the state of the compressor 0x08 is standby and 0x0B is start command
The second byte, data[1] doesn't seem to have a function.
The third byte is unknown but 0x1D works.
The forth and fifth also seem to not do anything.
Sixth byte is RPM control, 0x08 is inactive, 0x09 to 0x54
Seventh is also unknown, 0x00 works
Eighth is also unknown either 0x00 or 0x03 work
0x388 - Status Message
First byte, 0x01 is HV present. 0x02 is No HV present, 0x7C is startup/running.
Third and Fourth bytes seem to be RPM feedback.
Eighth byte status 0x00 is no CAN, 0x01 CAN error, 0x02 is 0x285 receive error and 0x03 other error
Example control code
void sendCANframeE() { //AC compressor
       outframe.id = 0x185;            // 0x185 0B 00 1D 00 00 08 00 03
        outframe.length = 8;            // Data payload 8 bytes
        outframe.extended = 0;          // Extended addresses - 0=11-bit 1=29bit
        outframe.rtr=1;                 //No request
        if(digitalRead(AC_pin) == LOW) { //AC pin is active
        outframe.data.bytes[0]=0x0B; // status command 08 stbd, 0B start
        }
        else {
        outframe.data.bytes[0]=0x08; //if we sense LOW we go to standby
        }
        outframe.data.bytes[1]=0x00; //
        outframe.data.bytes[2]=0x1D; // 1D works
        outframe.data.bytes[3]=0x00; //
        outframe.data.bytes[4]=0x00; //
        if(digitalRead(AC_pin) == LOW) { // AC is active
        if (ACrpm <= 3800) { // Power for spinup
        outframe.data.bytes[5]=0x25; // RPM command 08 to 54
        }
        else if ((ACrpm > 3500) && (ACrpm <= 4200)) { // power is reduced
        outframe.data.bytes[5]=0x20; // RPM command 08 to 54
        }
        }
        else {
        outframe.data.bytes[5]=0x08; //AC pin is inactive
        }
        outframe.data.bytes[6]=0x00;
        outframe.data.bytes[7]=0x03; // can be 00 or 03, it does not differentiate
       if(debug) {printFrame(&outframe,1);} //If the debug variable is set, show our transmitted frame
       if(myVars.CANport==0) Can0.sendFrame(outframe);    //Mail it
         else Can1.sendFrame(outframe);
This thread contains more detail information and is recommended reading: https://openinverter.org/forum/viewtopic.php?t=1997&start=25
References
- ↑ 1.0 1.1 3D Printable AC line plugs: https://www.printables.com/model/949837
- ↑ 2.0 2.1 Outlander AC Compressor 3D scan: https://grabcad.com/library/outlander-phev-ac-compressor-1
- ↑ 3.0 3.1 Outlander Compressor 7813A378 Bolt Pattern: https://www.printables.com/model/949824