Tesla Model S GEN1 Charger: Difference between revisions
(Categories) |
|||
| (45 intermediate revisions by one other user not shown) | |||
| Line 8: | Line 8: | ||
The charger is comprised of (three 3.3 kw modules?), each mounted to a liquid-cooled heat sink that forms the base. This assembly enables single phase AC charging only. | The charger is comprised of (three 3.3 kw modules?), each mounted to a liquid-cooled heat sink that forms the base. This assembly enables single phase AC charging only. | ||
The GEN1 chargers are considered to be more trouble-prone than the later units, and are not as popular for use in EV conversions or ground-up builds, partly because they do not support 3-phase AC input. However, they are used in many OEM installations that continue to need servicing. Examples of OEM installs include Telsa (all 2012-Sep2013 Model S), Toyota (all 2012-14 RAV4 EV<ref>https://en.wikipedia.org/wiki/Toyota_RAV4_EV#Second_generation_(2012)</ref>), and Mercedes-Benz ( | The GEN1 chargers are considered to be more trouble-prone than the later units, and are not as popular for use in EV conversions or ground-up builds, partly because they do not support 3-phase AC input. However, they are used in many OEM installations that continue to need servicing. Examples of OEM installs include Telsa (all 2012-Sep2013 Model S), Toyota (all 2012-14 RAV4 EV<ref>https://en.wikipedia.org/wiki/Toyota_RAV4_EV#Second_generation_(2012)</ref>), and Mercedes-Benz (initially "Electric Drive", later "B250e"<ref>https://en.wikipedia.org/wiki/Mercedes-Benz_B-Class#B-Class_Electric_Drive</ref>, 2014-17). As far as is known, these are identical from a hardware perspective<ref>https://www.myrav4ev.com/forum/viewtopic.php?p=29981#p29981</ref>, but the firmware differs and is not interchangeable between installations. | ||
A version of this unit was used in early Tesla Supercharger DCFC stations, with several ganged in parallel. | |||
| Line 27: | Line 31: | ||
* Tesla: In Single OBC vehicles, all connectors are used. This is the most common scenario. | * Tesla: In Single OBC vehicles, all connectors are used. This is the most common scenario. | ||
* Tesla: In Dual OBC vehicles, the second ("Slave") OBC does not utilize the | * Tesla: In Dual OBC vehicles, the second ("Slave") OBC does not utilize the following, as the first ("Master") OBC performs those functions: | ||
** the Fast Charge Contactors connectors | |||
** the HVIL Loop connector | |||
* Toyota: The Fast Charge Contactors connectors are not used, as the vehicle is not provisioned for DCFC and therefore there are no Fast Charge Contactors. | * Toyota: The Fast Charge Contactors connectors are not used, as the vehicle is not provisioned for DCFC and therefore there are no Fast Charge Contactors. | ||
* Mercedes-Benz: TBD (probably same as Toyota). | * Mercedes-Benz: TBD (probably same as Toyota). | ||
==== '''Logic Connector (X042 or X043)''' ==== | ==== '''Logic Connector (X042 or X043)''' ==== | ||
[[File:2012 ModelS LHD Release 16.1b.png|alt=Tesla Model S GEN1 OBC Logic Connector X042 Wiring. Tesla wiring diagrams do not define all circuits for a connector. This diagram has been amended to include circuits from other pages, to completely describe X042.|thumb|600x600px|Tesla Model S GEN1 OBC Logic Connector X042 Wiring, from Service Manual sheet 16.1. Tesla wiring diagrams do not define all circuits for a connector; this diagram has been amended to include circuits from other sheets 24.2 (HVIL) & 38.1 (CAN), to completely describe X042.]] | |||
[[File:Tesla Model S GEN1 OBC 007b.jpg|alt=Tesla Model S GEN1 OBC X042 Logic Connector pinout.|none|thumb|607x607px|Tesla Model S GEN1 OBC X042 Logic Connector pinout.]] | [[File:Tesla Model S GEN1 OBC 007b.jpg|alt=Tesla Model S GEN1 OBC X042 Logic Connector pinout.|none|thumb|607x607px|Tesla Model S GEN1 OBC X042 Logic Connector pinout.]] | ||
For Logic Connector X042 (X043, when referred to when provisioned in "Slave" duty), the mating connector needed to plug into the charger is Molex 19418-00'''26'''<ref>https://www.molex.com/molex/products/part-detail/crimp_housings/0194180026</ref> for 18-22 AWG (19418-0027 for 14-16 AWG) which is in the MX150L series. This connector features CPA<ref>https://www.molex.com/molex/products/family/mx150l_sealed_connector_system</ref> (Connector Position Assurance), a dual-locking feature. For bench-testing, etc., the non-CPA connector is Molex 19418-00'''38'''<ref>https://www.molex.com/molex/products/part-detail/crimp_housings/0194180038</ref> for 18-22 AWG (19418-0037 for 14-16 AWG); this connector requires one less operation to disengage, but is less suitable for automotive use or environments where heavy vibration is present. | For Logic Connector X042 (X043, when referred to when provisioned in "Slave" duty), the mating connector needed to plug into the charger is Molex 19418-00'''26'''<ref>https://www.molex.com/molex/products/part-detail/crimp_housings/0194180026</ref> for 18-22 AWG (19418-0027 for 14-16 AWG) which is in the MX150L series. This connector features CPA<ref>https://www.molex.com/molex/products/family/mx150l_sealed_connector_system</ref> (Connector Position Assurance), a dual-locking feature. For bench-testing, etc., the non-CPA connector is Molex 19418-00'''38'''<ref>https://www.molex.com/molex/products/part-detail/crimp_housings/0194180038</ref> for 18-22 AWG (19418-0037 for 14-16 AWG); this connector requires one less operation to disengage, but is less suitable for automotive use or environments where heavy vibration is present. | ||
| Line 58: | Line 65: | ||
|RD-BR | |RD-BR | ||
|- | |- | ||
|2 | |2 <b><span style="color:red;">**</span></b> | ||
|Charge Port: nozzle lock | |Charge Port: nozzle lock | ||
|"InsertEN out" | |"InsertEN out" | ||
| Line 82: | Line 89: | ||
|PU | |PU | ||
|- | |- | ||
|6 | |6 <b><span style="color:red;">**</span></b> | ||
| | |Fast Charge CAN | ||
| | |"FC_CAN". Possibly SWCAN. Connects only to BMS "FC_CAN+" | ||
|20 AWG (0.5mm²) | |20 AWG (0.5mm²) | ||
|RD-WH | |RD-WH | ||
| Line 95: | Line 102: | ||
|- | |- | ||
|8 | |8 | ||
| | |EVSE-Prox (PP) OUT | ||
|"Prox out", | |PP signal from EVSE to Drive Unit. Marked "Prox out" on Tesla's documentation, this was thought to be a "inhibit drive" signal, but testing has been inconclusive/negative for that function so far. | ||
|22 AWG (0.35mm²) | |22 AWG (0.35mm²) | ||
|OR-PU | |OR-PU | ||
| Line 113: | Line 120: | ||
|- | |- | ||
|11 | |11 | ||
|EVSE-Prox (PP) | |EVSE-Prox (PP) IN | ||
| | |PP signal from EVSE to OBC | ||
|20 AWG (0.5mm²) | |20 AWG (0.5mm²) | ||
|OR | |OR | ||
|- | |- | ||
|12 | |12 <b><span style="color:red;">**</span></b> | ||
|"BMS_12V_in" | |"BMS_12V_in" | ||
|"Cont_PWR (out)" (Contactor power?) from BMS (BMS enables | |"Cont_PWR (out)" (Contactor power?) from BMS (BMS enables DCFC contactors?) | ||
|18 AWG (0.75mm²) | |18 AWG (0.75mm²) | ||
|RD-GY | |RD-GY | ||
| Line 126: | Line 133: | ||
<nowiki>*</nowiki> = Specifications are from 2012 Tesla Model S documentation; other applications may have differing specs. | <nowiki>*</nowiki> = Specifications are from 2012 Tesla Model S documentation; other applications may have differing specs. | ||
<b><span style="color:red;">**</span></b> = Not used on RAV4 EV. | |||
===== Logic Connector when configured as Second/Slave OBC ===== | ===== Logic Connector when configured as Second/Slave OBC ===== | ||
| Line 131: | Line 140: | ||
[[File:Tesla Model S GEN1 OBC 030b.jpg|alt=Tesla GEN1 OBC: "Slave" configuration Logic and HVIL connections.|none|thumb|500x500px|Tesla GEN1 OBC: "Slave" configuration Logic and HVIL connections.]] | [[File:Tesla Model S GEN1 OBC 030b.jpg|alt=Tesla GEN1 OBC: "Slave" configuration Logic and HVIL connections.|none|thumb|500x500px|Tesla GEN1 OBC: "Slave" configuration Logic and HVIL connections.]]When the vehicle is configured for a Single OBC only, the Second/Slave Logic harness WWMA2 is parked in a "dummy" connector on the Rear HVJB. That connector does nothing, except that it contains 60 ohm resistance on pins 3 & 9, for the HVIL Loop. It does ''not'' contain CAN termination. For more information, see [[Tesla Model S GEN1 Rear HVJB#Logic "dummy" Connector|Tesla Model S GEN1 Rear HVJB, Logic "dummy" connector]].[[File:Tesla Model S Rear HVJB 18b.jpg|alt=Tesla Model S OBC in Single/Master configuration. Note "parked" harness WWMA2 on Rear HVJB.|none|thumb|600x600px|Tesla Model S OBC in Single/Master configuration. Note "parked" harness WWMA2 on Rear HVJB.]] | ||
[[File:Tesla Model S Rear HVJB 18b.jpg|alt=Tesla Model S OBC in Single/Master configuration. Note "parked" harness WWMA2 on Rear HVJB.|none|thumb|600x600px|Tesla Model S OBC in Single/Master configuration. Note "parked" harness WWMA2 on Rear HVJB.]] | |||
==== '''AC Input Connector''' ==== | ==== '''AC Input Connector''' ==== | ||
| Line 148: | Line 156: | ||
The female terminals for the Power Input/Output housings are Molex 42815-0134<ref>https://www.molex.com/molex/products/part-detail/crimp_terminals/0428150134</ref> for 8 AWG (8mm²). The Molex datasheet strongly recommends the use of [https://www.amazon.com/NyoGel-760G-Dielectric-Synthetic-Grease/dp/B07FD145CP Nylogel 760G dielectric grease] on this terminal if it will be exposed to vibration and/or thermal cycling<ref><nowiki>https://www.mouser.com/datasheet/2/276/0428150031_CRIMP_TERMINALS-1373081.pdf</nowiki></ref>. | The female terminals for the Power Input/Output housings are Molex 42815-0134<ref>https://www.molex.com/molex/products/part-detail/crimp_terminals/0428150134</ref> for 8 AWG (8mm²). However, the tool to crimp an open barrel terminal in 8 AWG practically only exists as the Molex 2002188700<ref>https://www.molex.com/molex/products/part-detail/application_toolin/2002188700</ref>, which is very expensive (>USD$680 (Apr2023)). Carefully consider this when ordering. One approach is to cut off the insulation crimp section from the rear of the terminal, then carefully use a crimp tool die that is designed for 10 AWG, being careful to not over-crimp. | ||
[[File:Molex 8 AWG open barrel terminal.jpg|alt=Molex 8 AWG open barrel terminal, modified by removing the rear insulation crimp section, then crimped using Pressmaster MCT and die 4300-3146, using the 10 AWG position.|thumb|600x600px|Molex 8 AWG open barrel terminal, modified by removing the rear insulation crimp section, then crimped using Pressmaster MCT and die 4300-3146, using the 10 AWG position.]] | |||
The Molex datasheet strongly recommends the use of [https://www.amazon.com/NyoGel-760G-Dielectric-Synthetic-Grease/dp/B07FD145CP Nylogel 760G dielectric grease] on this terminal if it will be exposed to vibration and/or thermal cycling<ref><nowiki>https://www.mouser.com/datasheet/2/276/0428150031_CRIMP_TERMINALS-1373081.pdf</nowiki></ref>. | |||
[[File:Molex 42815-0134.png|alt=Molex 42815-0134 female terminal, for 8AWG (8mm²) wire.|border|500x500px]] | [[File:Molex 42815-0134.png|alt=Molex 42815-0134 female terminal, for 8AWG (8mm²) wire.|border|500x500px]] | ||
| Line 154: | Line 167: | ||
Soldering this terminal is strongly discouraged. | |||
==== '''HVIL Connector (J5)''' ==== | ==== '''HVIL Connector (J5)''' ==== | ||
[[File:Tesla Model S GEN1 OBC 036b.jpg|alt=Tesla Model S GEN1 OBC: HVIL and HVJB AC Charging Bypass Contactor Control Connectors|thumb|600x600px|Tesla Model S GEN1 OBC: HVIL and HVJB Fast Charge Contactor Control Connectors|left]] | [[File:Tesla Model S GEN1 OBC 036b.jpg|alt=Tesla Model S GEN1 OBC: HVIL and HVJB AC Charging Bypass Contactor Control Connectors|thumb|600x600px|Tesla Model S GEN1 OBC: HVIL and HVJB Fast Charge Contactor Control Connectors|left]] | ||
[[File:2012 ModelS LHD Release 24.2-3b.png|alt=Telsa Model S GEN1 HVIL Schematic (amended).|thumb|600x600px|Telsa Model S GEN1 HVIL Schematic (amended): shows the lid switches explicitly called out, and the "parked" vs "installed" HVIL Loopback on Second/Slave OBC.|none]]HVIL (J5): Only the outside pins (top and bottom) are in use. These are used to integrate the HVJB's Lid Reed Switch into the HVIL loop. Every OBC contains a 60 ohm resistor in series with its Lid Switch (added to 2014 Wiring Diagram above, included by Tesla in Service Bulletin SB-10052449-4313 | [[File:2012 ModelS LHD Release 24.2-3b.png|alt=Telsa Model S GEN1 HVIL Schematic (amended).|thumb|600x600px|Telsa Model S GEN1 HVIL Schematic (amended): shows the lid switches explicitly called out, and the "parked" vs "installed" HVIL Loopback on Second/Slave OBC.|none]]HVIL (J5): Only the outside pins (top and bottom) are in use. These are used to integrate the HVJB's Lid Reed Switch into the HVIL loop. Every OBC contains a 60 ohm resistor in series with its Lid Switch (added to 2014 Wiring Diagram above, included by Tesla in Service Bulletin SB-10052449-4313, 2015), between Logic Connector (X042/X043) pin 3 and HVIL connector "top pin". | ||
* Tesla: Connected to the HVJB's Lid Reed Switch if the OBC is the only (single) or Master (dual) OBC. If the OBC is configured as Second/Slave, a loopback harness is connected instead. | * Tesla: Connected to the HVJB's Lid Reed Switch if the OBC is the only (single) or Master (dual) OBC. If the OBC is configured as Second/Slave, a loopback harness is connected instead. | ||
| Line 164: | Line 180: | ||
* MB: TBD (probably a loopback harness is connected). | * MB: TBD (probably a loopback harness is connected). | ||
Loopback harness installed (Tesla: Second/Slave OBC only; Toyota: All):[[File:Tesla Model S GEN1 OBC 018-1b.jpg|alt=Tesla Model S GEN1 OBC HVIL Loopback connector. Used on Tesla Slave OBC installations where the HVJB Lid Reed Switch is already connected to the HVIL circuit via the Master OBC. Also used in RAV4 EV, as there is no HVJB installed at all in those models.|none|thumb|500x500px|Tesla Model S GEN1 OBC HVIL Loopback connector. Used on Tesla Slave OBC installations where the HVJB Lid Reed Switch is already connected to the HVIL circuit via the Master OBC. Also used in RAV4 EV, as there is no HVJB installed at all in those models.]] | |||
For more information about the HVIL Loop, see the [[Tesla Model S GEN1 Rear HVJB#HVIL|Tesla Model S GEN1 Rear HVJB, HVIL]]. | |||
==== '''Fast Charge Contactors Control (J1 & J3)''' ==== | |||
* These four-pin connectors each drive a single contactor in the Rear HVJB. Those contactors bypass AC charging and allow DC from the Charge Port to connect directly to the HV bus for DCFC. | |||
* It is not known if the OBC performs PWM economizing. The Rear HVJB Fast Charge contactors are Tesla 1006871-00-A (TE Connectivity 2138957-2), but no datasheet can be found. | |||
* The top row pins are 12v; the bottom row pins are Auxiliary contacts, NO (normally open). | |||
* These connectors are not used in the Toyota RAV4 EV (and possibly not used in MB B250e) as the RAV4 EV is not provisioned for DCFC and does not have those contactors. | |||
==Common Issues== | |||
==== '''Grounding''' ==== | |||
The Tesla chargers are very sensitive to grounding. The case MUST be connected to vehicle 12v ground '''and''' EVSE earth/ground when charging. [https://openinverter.org/forum/viewtopic.php?p=3890#p3890] The OEM installation for the Tesla Model S has a prominent ground strap. | |||
[[File:Tesla Model S GEN1 OBC- Ground Strap.jpg|none|border|left|500x500px|Tesla Model S GEN1 OBC, showing prominent Ground Strap]] | |||
==== '''Fuses''' ==== | |||
Two 50A fuses protect the AC input legs: one fuse for Neutral, one for Hot/L1. These fuses are a common failure point. The cause of their failure is not known. Some units have had their fuses fail more than once. Typically, only one fails at a time. The OEM fuse is Ferraz Shawmut (Mersen) 50A 500VAC fuse, part No. A50P50-4<ref>https://teslamotorsclub.com/tmc/posts/1899210/</ref>. Some people have found that after replacing a single failed fuse, the other one will later fail; it is surmised that this is possibly a genuine instance of a fuse weakening over time/use, so the generic recommendation is to replace them both. Typical pricing for the Ferraz Shawmut units is USD$50-100 each (Mar2023); Eaton Bussmann (Cooper) FWH-50B is said<ref>https://www.myrav4ev.com/forum/viewtopic.php?p=29155#p29155</ref> to be an equivalent, and can be had for under $30 (Mar2023)<ref>https://www.amazon.com/Cooper-Bussmann-FWH-50B-Amp-Fuse/dp/B0026HCLBQ</ref> | |||
* [https://www.youtube.com/watch?v=yPOtAotzvTY Fuse replacement info video by Nick Schlife] (Nov2016) | |||
* [https://teslamotorsclub.com/tmc/posts/1899146/ Fuse replacement info by member scaesare] and others (Jan2017) | |||
These fuses are "semiconductor protection fuses" and are "very fast acting"<ref>https://specs.thefuseshop.com/Ferraz_Shawmut_Mersen_A50P_Datasheet.pdf</ref>. The Eaton Bussman (Cooper) units are imprinted with the common diode symbol that represents semiconductor fuses, and it does not imply that the fuse has a diode function.[[File:Eaton Bussmann FWH-50B Semiconductor fuses.jpg|alt=Eaton Bussmann FWH-50B semiconductor fuses are fast-blow to protect sensitive components. This fuse is reported to be a replacement for OEM Ferraz Shawmut A50P50-4|thumb|Eaton Bussmann FWH-50B semiconductor fuses are fast-blow to protect sensitive components. This fuse is reported to be a replacement for OEM Ferraz Shawmut A50P50-4|left|533x533px]] | |||
[[File:Semiconductor Fuse explanation.png|alt=Semiconductor fuses may have a diode symbol imprinted, but this does not imply that the fuse functions as a diode.|thumb|600x600px|Semiconductor fuses may have a diode symbol imprinted, but this does not imply that the fuse functions as a diode.]] | |||
[[File:Fuses Bussmann-Eaton FWH-50B 02b.jpg|alt=Eaton Bussmann (Cooper) FWH-50B, showing the diode electrical symbol which indicates that it's a semiconductor fuse (very fast acting).|center|thumb|600x600px|Eaton Bussmann (Cooper) FWH-50B, showing the diode electrical symbol which indicates that it's a semiconductor fuse (very fast acting).]] | |||
==Important Considerations== | ==Important Considerations== | ||
===Output Voltage Range === | ===Output Voltage Range === | ||
| Line 203: | Line 223: | ||
{| class="wikitable" cellpadding="10" | {| class="wikitable" cellpadding="10" | ||
|'''HEED DAMIEN'S WARNING:'''<ref>https://openinverter.org/forum/viewtopic.php?p=9994#p9994</ref> | |'''HEED DAMIEN'S WARNING:'''<ref>https://openinverter.org/forum/viewtopic.php?p=9994#p9994</ref> | ||
"[https://openinverter.org/forum/viewtopic.php?f=10&t=78&p=9994#p9994 Running a Tesla charger at much under 200v | (regarding the GEN2 OBC, which may or may not apply to the GEN1) | ||
"[https://openinverter.org/forum/viewtopic.php?f=10&t=78&p=9994#p9994 Running a Tesla charger at much under 200v DC will cause it to explode. Yes I know the label says 50 to 450v but it lies. Yes I blew one up discovering this.]" | |||
|} | |} | ||
== CAN == | |||
WIP | |||
==Errata== | ==Errata== | ||
* Dimensions: 19-13/16" L x 13-7/16" W x 4-7/16" H (503mm L x 341mm W x 113mm H) | |||
* Weight: 42 lbs (19 kg) | * Weight: 42 lbs (19 kg) | ||
| Line 225: | Line 249: | ||
==Notes== | ==Notes== | ||
[[Category:Charger]] | [[Category:Charger]] | ||
[[Category:Tesla]] | |||
Latest revision as of 16:59, 20 December 2024
Overview
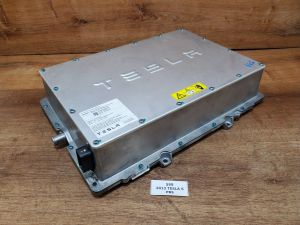
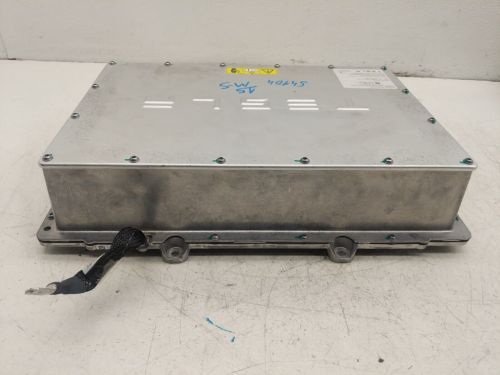
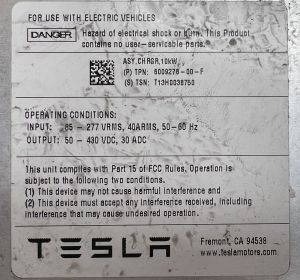
The Tesla GEN1 on-board AC charger (OBC) was a single phase 10kW AC charger that was fitted originally and primarily in the Tesla Model S, from Jun2012 through late2013*, when it was replaced with GEN2. GEN1 models are easy to identify, having the word "TESLA" stamped on the top metalwork and having no black anti-tamper tape; the GEN2 charger lacks the Tesla identifier stamped on the metalwork, and has anti-tamper tape over the seams.
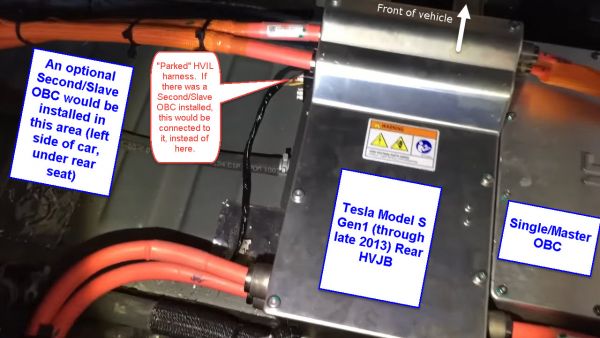
One (or optionally two, in a Master/Slave configuration) GEN1 chargers are installed beneath the rear seats in the Model S for AC charging. The Single/Master OBC is on the right side of center. If two OBCs are fitted, the Second/Slave is fitted to the left of center under the rear seat; both are identical hardware, though the firmware differs.
The charger is comprised of (three 3.3 kw modules?), each mounted to a liquid-cooled heat sink that forms the base. This assembly enables single phase AC charging only.
The GEN1 chargers are considered to be more trouble-prone than the later units, and are not as popular for use in EV conversions or ground-up builds, partly because they do not support 3-phase AC input. However, they are used in many OEM installations that continue to need servicing. Examples of OEM installs include Telsa (all 2012-Sep2013 Model S), Toyota (all 2012-14 RAV4 EV[1]), and Mercedes-Benz (initially "Electric Drive", later "B250e"[2], 2014-17). As far as is known, these are identical from a hardware perspective[3], but the firmware differs and is not interchangeable between installations.
A version of this unit was used in early Tesla Supercharger DCFC stations, with several ganged in parallel.
* The GEN2 OBCs were apparently phased in gradually. There are reports of Dec2013 with GEN1 OBCs[4], and Oct2013 with GEN2 OBCs[5][6].
Charger Connectors
Overview
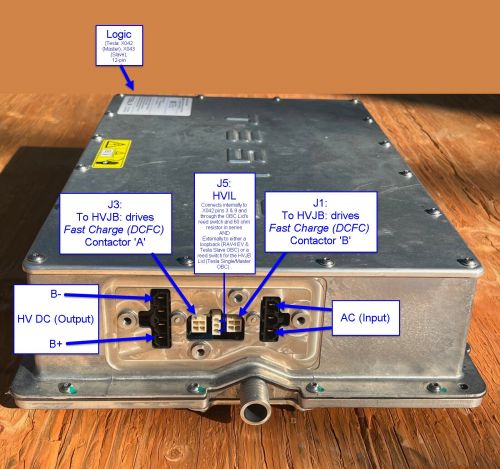
There are six discrete connectors on the GEN1 OBC.
- Logic (X042 (or X043, when used in "Slave" mode))
- AC (Input)
- DC (Output)
- HVIL (High Voltage InterLock)
- Fast Charge (DCFC) Contactors Control (2x)
In some applications, not all six connectors may be in use:
- Tesla: In Single OBC vehicles, all connectors are used. This is the most common scenario.
- Tesla: In Dual OBC vehicles, the second ("Slave") OBC does not utilize the following, as the first ("Master") OBC performs those functions:
- the Fast Charge Contactors connectors
- the HVIL Loop connector
- Toyota: The Fast Charge Contactors connectors are not used, as the vehicle is not provisioned for DCFC and therefore there are no Fast Charge Contactors.
- Mercedes-Benz: TBD (probably same as Toyota).
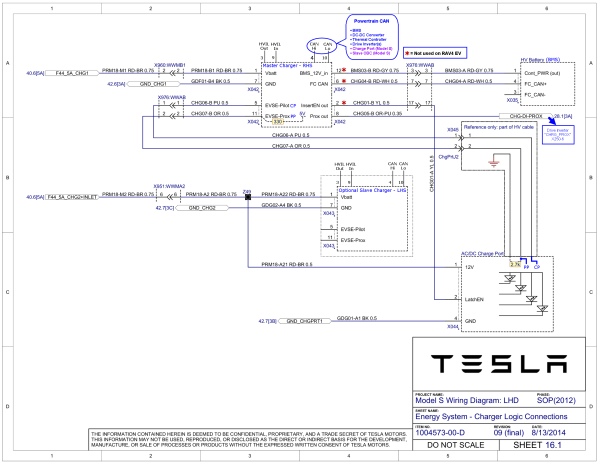
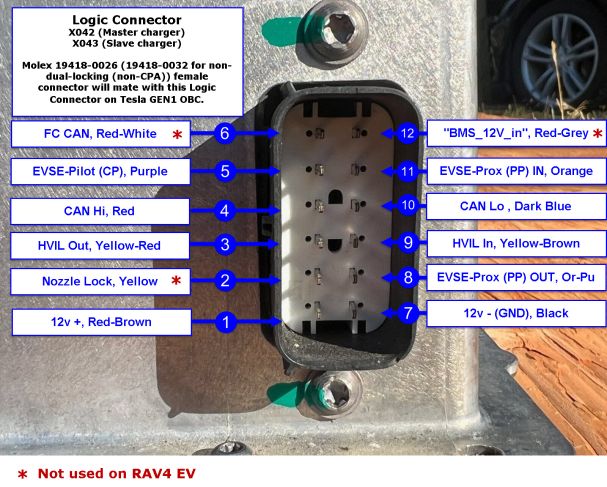
Logic Connector (X042 or X043)
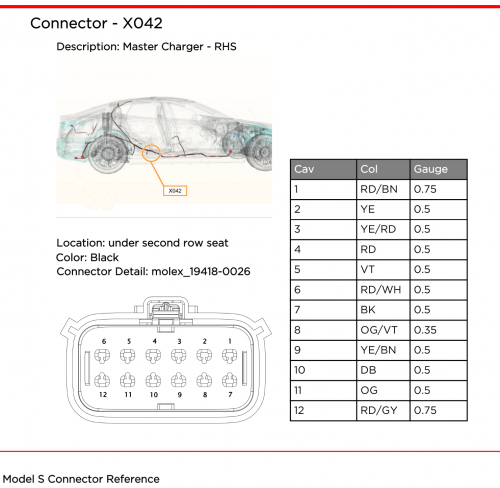
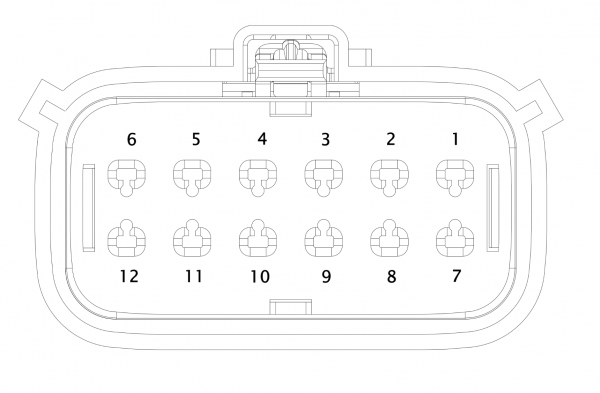
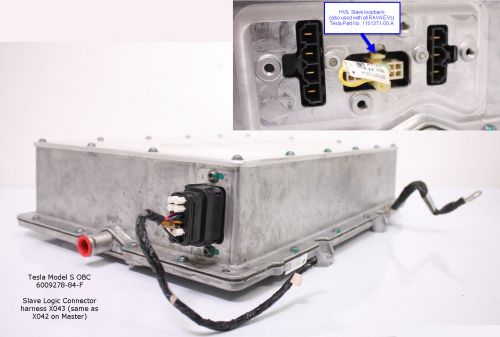
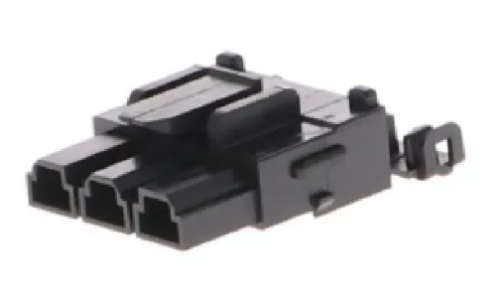
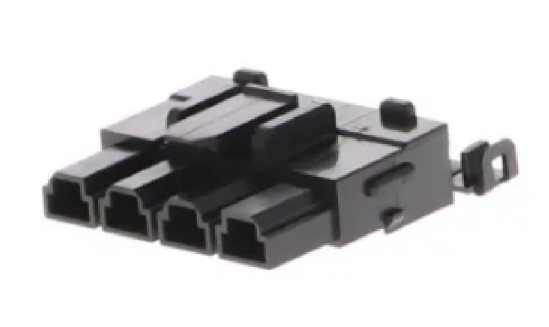
For Logic Connector X042 (X043, when referred to when provisioned in "Slave" duty), the mating connector needed to plug into the charger is Molex 19418-0026[7] for 18-22 AWG (19418-0027 for 14-16 AWG) which is in the MX150L series. This connector features CPA[8] (Connector Position Assurance), a dual-locking feature. For bench-testing, etc., the non-CPA connector is Molex 19418-0038[9] for 18-22 AWG (19418-0037 for 14-16 AWG); this connector requires one less operation to disengage, but is less suitable for automotive use or environments where heavy vibration is present.
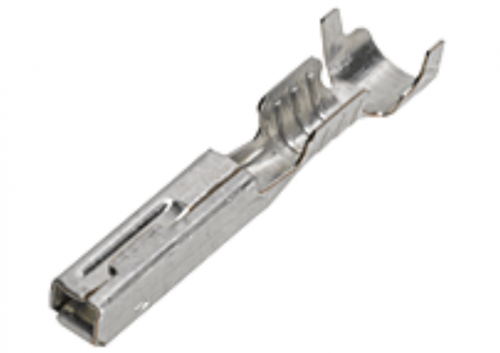
The female terminals for this housing are Molex 19420-0010[10] (18-22 AWG; 19420-0009 for 14-16 AWG). These are tin-plated, and are rated for (25) cycles. Gold-plated versions are available, and they are rated for (100) cycles.
| Pin No. | Function | Description | Tesla
Wire size * |
Telsa
Wire Color * |
|---|---|---|---|---|
| 1 | 12v supply | 18 AWG (0.75mm²) | RD-BR | |
| 2 ** | Charge Port: nozzle lock | "InsertEN out" | 20 AWG (0.5mm²) | YL |
| 3 | HVIL Out | 20 AWG (0.5mm²) | YL-RD | |
| 4 | CAN + | 20 AWG (0.5mm²) | RD | |
| 5 | EVSE-Pilot (CP) | 20 AWG (0.5mm²) | PU | |
| 6 ** | Fast Charge CAN | "FC_CAN". Possibly SWCAN. Connects only to BMS "FC_CAN+" | 20 AWG (0.5mm²) | RD-WH |
| 7 | 12v GND | 20 AWG (0.5mm²) | BK | |
| 8 | EVSE-Prox (PP) OUT | PP signal from EVSE to Drive Unit. Marked "Prox out" on Tesla's documentation, this was thought to be a "inhibit drive" signal, but testing has been inconclusive/negative for that function so far. | 22 AWG (0.35mm²) | OR-PU |
| 9 | HVIL In | 20 AWG (0.5mm²) | YL-BR | |
| 10 | CAN - | 20 AWG (0.5mm²) | DB | |
| 11 | EVSE-Prox (PP) IN | PP signal from EVSE to OBC | 20 AWG (0.5mm²) | OR |
| 12 ** | "BMS_12V_in" | "Cont_PWR (out)" (Contactor power?) from BMS (BMS enables DCFC contactors?) | 18 AWG (0.75mm²) | RD-GY |
* = Specifications are from 2012 Tesla Model S documentation; other applications may have differing specs.
** = Not used on RAV4 EV.
Logic Connector when configured as Second/Slave OBC
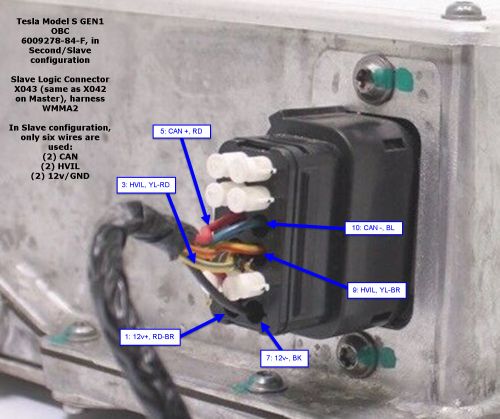
When an OBC is provisioned as a Second OBC ("Slave"), the Logic connector is populated with a subset of the above, as the First OBC ("Master") handles all external interfaces. Only power/GND, CAN, and HVIL are connected.
When the vehicle is configured for a Single OBC only, the Second/Slave Logic harness WWMA2 is parked in a "dummy" connector on the Rear HVJB. That connector does nothing, except that it contains 60 ohm resistance on pins 3 & 9, for the HVIL Loop. It does not contain CAN termination. For more information, see Tesla Model S GEN1 Rear HVJB, Logic "dummy" connector.
AC Input Connector
The Power Input/Output connectors are of the Molex Mini-Fit Sr. wire-to-wire series[11]. The datasheet is here.
The AC Input Connector housing needed to plug into the charger is Molex 42816-0312[12]
DC Output Connector
The DC Output Connector housing needed to plug into the charger is Molex 42816-0412[13]
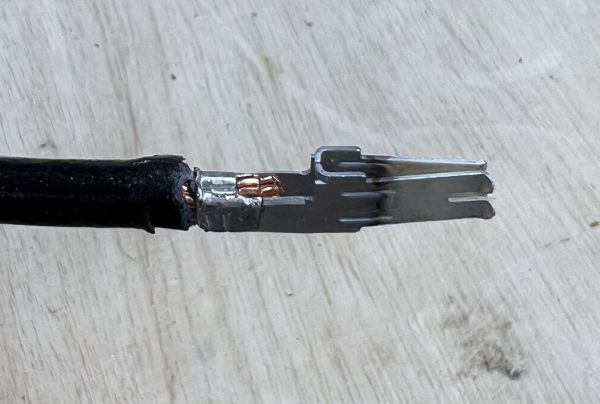
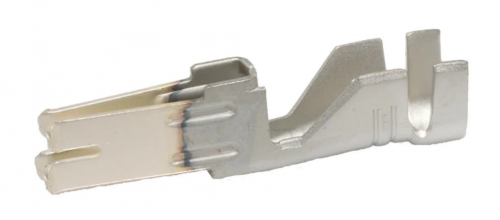
The female terminals for the Power Input/Output housings are Molex 42815-0134[14] for 8 AWG (8mm²). However, the tool to crimp an open barrel terminal in 8 AWG practically only exists as the Molex 2002188700[15], which is very expensive (>USD$680 (Apr2023)). Carefully consider this when ordering. One approach is to cut off the insulation crimp section from the rear of the terminal, then carefully use a crimp tool die that is designed for 10 AWG, being careful to not over-crimp.
The Molex datasheet strongly recommends the use of Nylogel 760G dielectric grease on this terminal if it will be exposed to vibration and/or thermal cycling[16].
Soldering this terminal is strongly discouraged.
HVIL Connector (J5)
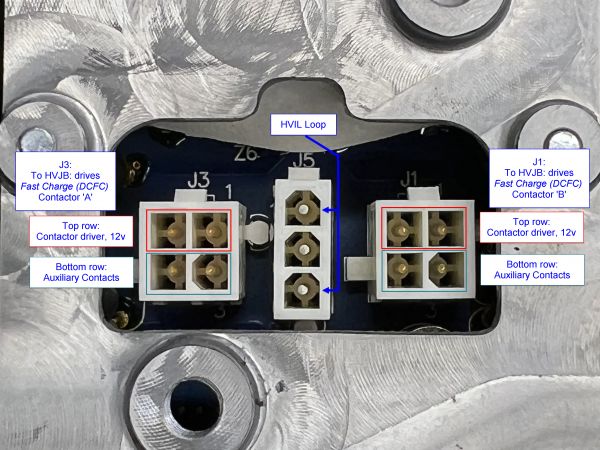
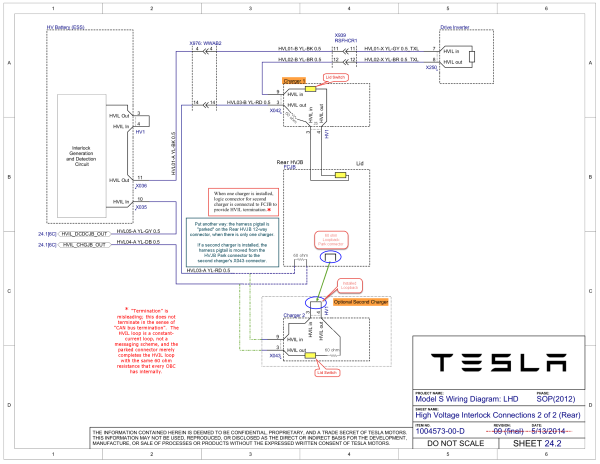
HVIL (J5): Only the outside pins (top and bottom) are in use. These are used to integrate the HVJB's Lid Reed Switch into the HVIL loop. Every OBC contains a 60 ohm resistor in series with its Lid Switch (added to 2014 Wiring Diagram above, included by Tesla in Service Bulletin SB-10052449-4313, 2015), between Logic Connector (X042/X043) pin 3 and HVIL connector "top pin".
- Tesla: Connected to the HVJB's Lid Reed Switch if the OBC is the only (single) or Master (dual) OBC. If the OBC is configured as Second/Slave, a loopback harness is connected instead.
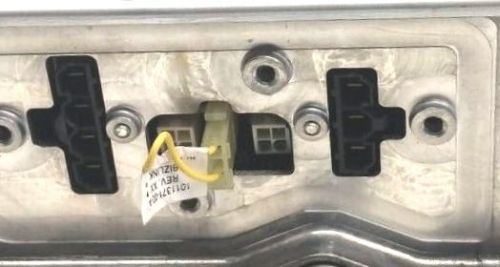
- Tesla: The loopback harness, Tesla 1101371-00-A, is included/stored inside all Tesla Model S GEN1 Rear HVJB in an internal "parking" socket, when only a single OBC is provisioned.
- Toyota: A loopback harness is always connected.
- MB: TBD (probably a loopback harness is connected).
Loopback harness installed (Tesla: Second/Slave OBC only; Toyota: All):
For more information about the HVIL Loop, see the Tesla Model S GEN1 Rear HVJB, HVIL.
Fast Charge Contactors Control (J1 & J3)
- These four-pin connectors each drive a single contactor in the Rear HVJB. Those contactors bypass AC charging and allow DC from the Charge Port to connect directly to the HV bus for DCFC.
- It is not known if the OBC performs PWM economizing. The Rear HVJB Fast Charge contactors are Tesla 1006871-00-A (TE Connectivity 2138957-2), but no datasheet can be found.
- The top row pins are 12v; the bottom row pins are Auxiliary contacts, NO (normally open).
- These connectors are not used in the Toyota RAV4 EV (and possibly not used in MB B250e) as the RAV4 EV is not provisioned for DCFC and does not have those contactors.
Common Issues
Grounding
The Tesla chargers are very sensitive to grounding. The case MUST be connected to vehicle 12v ground and EVSE earth/ground when charging. [1] The OEM installation for the Tesla Model S has a prominent ground strap.
Fuses
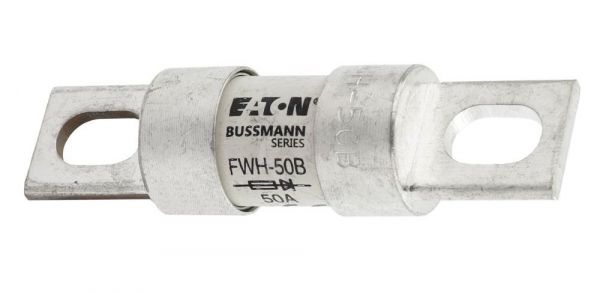
Two 50A fuses protect the AC input legs: one fuse for Neutral, one for Hot/L1. These fuses are a common failure point. The cause of their failure is not known. Some units have had their fuses fail more than once. Typically, only one fails at a time. The OEM fuse is Ferraz Shawmut (Mersen) 50A 500VAC fuse, part No. A50P50-4[17]. Some people have found that after replacing a single failed fuse, the other one will later fail; it is surmised that this is possibly a genuine instance of a fuse weakening over time/use, so the generic recommendation is to replace them both. Typical pricing for the Ferraz Shawmut units is USD$50-100 each (Mar2023); Eaton Bussmann (Cooper) FWH-50B is said[18] to be an equivalent, and can be had for under $30 (Mar2023)[19]
- Fuse replacement info video by Nick Schlife (Nov2016)
- Fuse replacement info by member scaesare and others (Jan2017)
These fuses are "semiconductor protection fuses" and are "very fast acting"[20]. The Eaton Bussman (Cooper) units are imprinted with the common diode symbol that represents semiconductor fuses, and it does not imply that the fuse has a diode function.
Important Considerations
Output Voltage Range
| HEED DAMIEN'S WARNING:[21]
(regarding the GEN2 OBC, which may or may not apply to the GEN1) |
CAN
WIP
Errata
- Dimensions: 19-13/16" L x 13-7/16" W x 4-7/16" H (503mm L x 341mm W x 113mm H)
- Weight: 42 lbs (19 kg)
Tesla Part Numbers (TPN):
- 6009278-00-x
- 6009278-84-x (ReManufactured + Slave?)
- 6009354-00-x
Toyota Part Numbers:
- G9090-0R010 (discontinued)
- G9090-0R011
MB Part Number(s):
- TBD
Notes
- ↑ https://en.wikipedia.org/wiki/Toyota_RAV4_EV#Second_generation_(2012)
- ↑ https://en.wikipedia.org/wiki/Mercedes-Benz_B-Class#B-Class_Electric_Drive
- ↑ https://www.myrav4ev.com/forum/viewtopic.php?p=29981#p29981
- ↑ https://youtu.be/yPOtAotzvTY?t=16
- ↑ https://teslamotorsclub.com/tmc/posts/6516611
- ↑ https://teslamotorsclub.com/tmc/posts/3042384
- ↑ https://www.molex.com/molex/products/part-detail/crimp_housings/0194180026
- ↑ https://www.molex.com/molex/products/family/mx150l_sealed_connector_system
- ↑ https://www.molex.com/molex/products/part-detail/crimp_housings/0194180038
- ↑ https://www.molex.com/molex/products/part-detail/crimp_terminals/0194200010
- ↑ https://www.molex.com/molex/products/family/minifit_sr
- ↑ https://www.molex.com/molex/products/part-detail/crimp_housings/0428160312
- ↑ https://www.molex.com/molex/products/part-detail/crimp_housings/0428160412
- ↑ https://www.molex.com/molex/products/part-detail/crimp_terminals/0428150134
- ↑ https://www.molex.com/molex/products/part-detail/application_toolin/2002188700
- ↑ https://www.mouser.com/datasheet/2/276/0428150031_CRIMP_TERMINALS-1373081.pdf
- ↑ https://teslamotorsclub.com/tmc/posts/1899210/
- ↑ https://www.myrav4ev.com/forum/viewtopic.php?p=29155#p29155
- ↑ https://www.amazon.com/Cooper-Bussmann-FWH-50B-Amp-Fuse/dp/B0026HCLBQ
- ↑ https://specs.thefuseshop.com/Ferraz_Shawmut_Mersen_A50P_Datasheet.pdf
- ↑ https://openinverter.org/forum/viewtopic.php?p=9994#p9994
