Bidirectional Charging: Difference between revisions
page created |
Added parts list |
||
| Line 19: | Line 19: | ||
In the open-source world, however, we do not need to wait until OEMs and charger manufacturers implement the latest ISO15118. We can support bidirectional charging even with the "old" DIN spec. The strategy is: Even if the car is requesting to be charged, it also accepts discharging, without terminating the charging session. It may terminate if the SOC falls below a certain, configurable level, to prevent an empty battery. The car announces the allowed charge current, and the same value, just in opposite direction, can be used as a discharge current limit, too. | In the open-source world, however, we do not need to wait until OEMs and charger manufacturers implement the latest ISO15118. We can support bidirectional charging even with the "old" DIN spec. The strategy is: Even if the car is requesting to be charged, it also accepts discharging, without terminating the charging session. It may terminate if the SOC falls below a certain, configurable level, to prevent an empty battery. The car announces the allowed charge current, and the same value, just in opposite direction, can be used as a discharge current limit, too. | ||
=== Collection of documents related to bidirectional charging | == Practical implementation with parts list == | ||
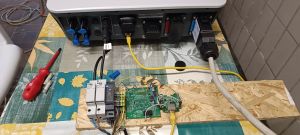
[[File:CCS bidirectional charger.jpg|thumb|First prototype]] | |||
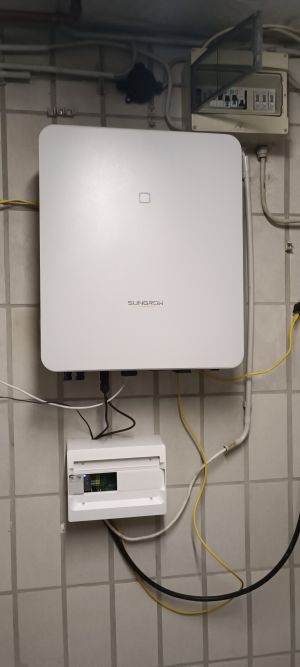
One way to DIY an bidirectional charger is the use of a hybrid PV inverter with high voltage battery input. The advantage is that these are mass-produced (thus cheap) and conform to the various legal requirements. The inverter then handles power transfer and optionally smart functions such as zero grid import/export and we only need to supply the surrounding logic and electrics. | |||
[[File:CCS bidirectional charger 2.jpg|thumb|Second version]] | |||
This component list is just an example that has proven to work. It is preliminary and has not been tested with OEM cars yet, so it will likely be extended. As always, you are working with high voltage and especially grid voltage. Make sure you are qualified otherwise ask for help. | |||
{| class="wikitable" | |||
|+ | |||
!Item | |||
!Approximate cost | |||
!Link/Source | |||
!Remarks | |||
|- | |||
|Sungrow SH5.0RT (or more powerful variant) | |||
|850€ | |||
|[https://ger.sungrowpower.com/productDetail/905 Sungrow] | |||
|Pick an inverter that is supported by [https://github.com/dalathegreat/Battery-Emulator/wiki#supported-inverters-list Battery Emulator] | |||
|- | |||
|CCS Connector | |||
|90€ | |||
|AliExpress | |||
|Plain connector without cable | |||
|- | |||
|BeagleBone Green | |||
|45€ | |||
|[https://www.mouser.de/ProductDetail/Seeed-Studio/102010027?qs=Hlcjo%2FO3pQ5AxSET1oW%252B%252Bg%3D%3D Mouser] | |||
| | |||
|- | |||
|BeagleBone COMCPE | |||
|40€ | |||
|[https://www.mouser.de/ProductDetail/GHI-Electronics/COMCPE-BBBCAPE?qs=lYGu3FyN48eQlTRiRFk3ug%3D%3D Mouser] | |||
|RS485, CAN comm and 2x relay driver | |||
|- | |||
|TPLink TL-PA4010 | |||
|15€ | |||
| | |||
|Powerline modem | |||
|- | |||
|4x4mm flexible cable | |||
|4€/m | |||
|Local hardware store | |||
|Sufficient for 25A charging current and carrying CP signal | |||
|- | |||
|2 Fuse blocks | |||
|6€ each | |||
|[https://www.mouser.de/ProductDetail/Altech/002540101?qs=rrS6PyfT74edEoVfbnqxvg%3D%3D Mouser] | |||
| | |||
|- | |||
|2 25A fuses | |||
|8€ each | |||
|[https://www.mouser.de/ProductDetail/Eaton-Electronics/EKM10-25-1P?qs=sGAEpiMZZMsIz3CjQ1xegZx2pdJYlyprSptsITKY%2FrCWMtgS7UD2BQ%3D%3D Mouser] | |||
|400V AC rated from your local hardware store suffices as it's 2 in series | |||
|- | |||
|12V 2A DIN rail supply | |||
|18€ | |||
|[https://www.mouser.de/ProductDetail/MEAN-WELL/HDR-30-12?qs=pHY8AWQbqIN66yYHZne39A%3D%3D Mouser] | |||
|In case relays are needed later on, otherwise 5V model makes things easier | |||
|- | |||
|12V to 5V step-down converter | |||
|5€ | |||
|ebay or ali | |||
|Needed if you chose 12V supply | |||
|- | |||
|DIN rail cabinet | |||
|20€ | |||
|Local hardware store | |||
| | |||
|- | |||
|MC4 connector set | |||
|5€ | |||
| | |||
| | |||
|} | |||
== Collection of documents related to bidirectional charging == | |||
todo | todo | ||
== References == | |||
todo | todo | ||
Revision as of 17:14, 17 November 2024
Bidirectional charging means, that the car is able to provide power to the outside world, via the charge port.
Tags: bidi, inverse charging, vehicle-to-load, V2L, vehicle-to-home, V2H, vehicle-to-grid, V2G
https://openinverter.org/forum/viewtopic.php?t=5090
https://openinverter.org/forum/viewtopic.php?t=3551
Bidirectional Charging via AC
Some OEM on-board-chargers are able to create AC voltage. Todo: any reverse-engineering ongoing for such chargers? E.g. for Hyundai/Kia E-GMP?
Bidirectional Charging via CHAdeMO
The CHAdeMO standard was planned for supporting bidirectional power transfer from the beginning. Todo: Any open-source projects in this direction?
Bidirectional Charging via CCS
The CCS standard did not plan bidirectional power transfer. This means, depending on the implementation details of the cars charge controller, the car may or may not allow to draw energy out of the CCS port. Later versions of the CCS standard, ISO15118 (2020?), are defining special communication procedures for bidirectional power transfer. But it will take some time until this standard is widely adapted.
In the open-source world, however, we do not need to wait until OEMs and charger manufacturers implement the latest ISO15118. We can support bidirectional charging even with the "old" DIN spec. The strategy is: Even if the car is requesting to be charged, it also accepts discharging, without terminating the charging session. It may terminate if the SOC falls below a certain, configurable level, to prevent an empty battery. The car announces the allowed charge current, and the same value, just in opposite direction, can be used as a discharge current limit, too.
Practical implementation with parts list

One way to DIY an bidirectional charger is the use of a hybrid PV inverter with high voltage battery input. The advantage is that these are mass-produced (thus cheap) and conform to the various legal requirements. The inverter then handles power transfer and optionally smart functions such as zero grid import/export and we only need to supply the surrounding logic and electrics.

This component list is just an example that has proven to work. It is preliminary and has not been tested with OEM cars yet, so it will likely be extended. As always, you are working with high voltage and especially grid voltage. Make sure you are qualified otherwise ask for help.
| Item | Approximate cost | Link/Source | Remarks |
|---|---|---|---|
| Sungrow SH5.0RT (or more powerful variant) | 850€ | Sungrow | Pick an inverter that is supported by Battery Emulator |
| CCS Connector | 90€ | AliExpress | Plain connector without cable |
| BeagleBone Green | 45€ | Mouser | |
| BeagleBone COMCPE | 40€ | Mouser | RS485, CAN comm and 2x relay driver |
| TPLink TL-PA4010 | 15€ | Powerline modem | |
| 4x4mm flexible cable | 4€/m | Local hardware store | Sufficient for 25A charging current and carrying CP signal |
| 2 Fuse blocks | 6€ each | Mouser | |
| 2 25A fuses | 8€ each | Mouser | 400V AC rated from your local hardware store suffices as it's 2 in series |
| 12V 2A DIN rail supply | 18€ | Mouser | In case relays are needed later on, otherwise 5V model makes things easier |
| 12V to 5V step-down converter | 5€ | ebay or ali | Needed if you chose 12V supply |
| DIN rail cabinet | 20€ | Local hardware store | |
| MC4 connector set | 5€ |
todo
References
todo